The short answer
- Solarize in the hottest, sunniest part of summer: UC IPM and UT Extension point to June through August for inland California and Tennessee, and NC State Extension says July and August in North Carolina.[1][2][4]
- Clear and smooth the bed, wet it to at least 12 inches deep, then cover it with clear plastic, not black, stretched tight with the edges buried.[1][2][4]
- Leave it 4 to 6 weeks in hot inland California and at least 6 weeks in Tennessee; cool, cloudy or windy sites can need up to 8 weeks, and Colorado State says spring or fall solarizing may take 6 to 8.[1][2][3]
- The effect is strongest near the surface. A good job practically eliminates most soilborne pathogens and weed seeds in the top 2 to 3 inches, with some reduction deeper down.[2][1]
- After the plastic comes off, plant without deep tilling or digging, so untreated soil from below doesn't come back up.[1][2][4]
Soil pests it helps with
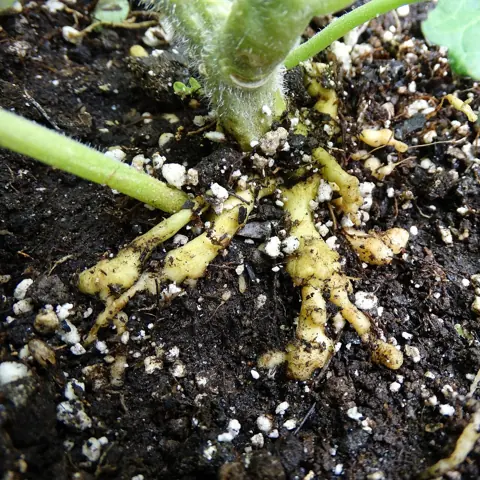 Root-Knot Nematodes
Meloidogyne spp. (most often M. incognita in South Carolina gardens)
Root-knot nematodes are microscopic roundworms in the soil that feed inside plant roots and make them swell into knots and galls, leaving tomatoes, okra, beans, squash and many other plants stunted and quick to wilt.
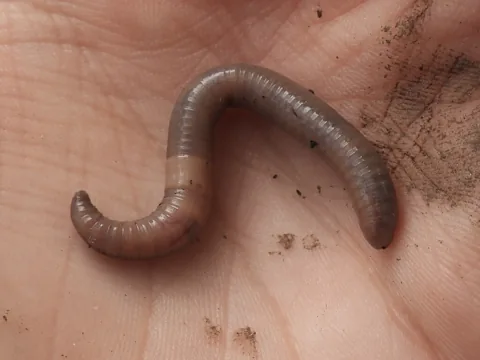 Jumping Worms
Amynthas species (e.g., A. agrestis, A. tokioensis)
Jumping worms are invasive earthworms from eastern Asia that live in leaf litter and the top few inches of soil. They turn soil into dry, granular pellets like coffee grounds, strip it of nutrients and can kill plants, and they spread mostly in soil, mulch, compost and potted plants that people move.
How it works
Clear plastic lets the sun's energy into the soil and traps it there, heating the top 12 to 18 inches to temperatures lethal to many weeds, plant pathogens, nematodes and insects. Done well, the top layers can reach as high as 140°F, depending on location.[1][5]
Heat falls off with depth. UC IPM gives typical field maximums of 108° to 140°F at 2 inches and 90° to 99°F at 18 inches, and control is usually best for organisms in the upper 6 inches.[1]
NC State Extension gives similar numbers: under clear, sunny skies with good soil moisture, the top 2 to 6 inches can reach 120° to 140°F, with deeper layers heating less. UT puts typical temperatures under the plastic at 120° to 125°F.[4][2]
Moisture matters. Wet soil conducts heat better than dry soil, and moisture leaves heat-weakened pests more open to attack by beneficial soil microorganisms.[1][3]
Some pests die within a few days, but many others take 4 to 6 weeks of full summer sun. How well a pest is controlled depends on how hot the soil gets, how deep the heat goes, how long it lasts and how sensitive that pest is.[1]
Colorado State gives an example of how time and heat trade off: many fungi that grow best at moderate temperatures need 2 to 4 weeks at 99°F to kill 90 percent of their populations, but only 1 to 6 hours at 117°F.[3]
What it controls, and what it doesn't
Plants often grow faster and yield more after solarization, probably because of better disease and weed control, more available nutrients and more beneficial microorganisms.[1]
In UT research plots in Jackson, Tennessee, four to five weeks under two layers of clear plastic raised the yield of fall snap beans by more than 90 percent, and weeds were down by more than 99 percent three months later and by 50 percent a year later.[2]
- Diseases: many soilborne fungal and bacterial diseases, including Verticillium wilt, Fusarium wilt, Phytophthora root rot, southern blight, damping-off, crown gall, tomato canker and potato scab. A few heat-tolerant ones, such as the causes of melon decline and charcoal rot, are harder to control.[1][3]
- Nematodes: reduced, but less reliably than diseases and weeds. Nematodes can move deeper to escape the heat and return quickly afterward, and those below the treated layer can survive and later damage deep-rooted plants. Colorado State lists root-knot, root lesion and dagger nematodes among those solarization reduces.[1][3]
- Weeds: many annual weeds. Perennials with deep roots, tubers or rhizomes often resprout; bermudagrass and johnsongrass rhizomes close to the surface may be controlled, but results on purple and yellow nutsedge, field bindweed growing from rhizomes and some clovers are inconsistent. Colorado State likewise says it doesn't control dodder (Cuscuta), bindweed or purple nutsedge.[1][3]
- Beneficial organisms: the heat kills some along with the pests, but beneficial bacteria and fungi, including mycorrhizal fungi, survive or recolonize quickly. Earthworms are generally thought to burrow deeper to escape the heat, though detailed information is lacking. Colorado State also found that beneficial microorganisms may drop at first but quickly recolonize solarized soil.[2][1][3]
When and where it works
Soil gets hottest when days are long, air temperatures are high, skies are clear and wind is light. Cloudy days heat less, wind carries heat away and can loosen or damage the plastic, and shady spots may not heat enough.[1]
UC IPM's best window for inland California is June to August, with July the most reliable month; coastal areas may not get warm, fog-free spells until August or September. UT recommends June through August, and NC State says July and August are typical in North Carolina. Colorado State notes that spring or fall solarizing may need a longer 6 to 8 weeks.[1][2][4][3]
Pick open ground with no shade from trees or buildings. Flat ground or a slope facing south or southwest heats best; north-facing slopes heat less and may give poorer control. UVM Extension adds that solarization is unlikely to work well in shaded spots.[1][2][5]
How to solarize a garden bed
- Clear the area of weeds, crop debris and mulch, and remove sticks, sharp stones and anything else that could puncture the plastic.[2][4]
- Loosen the soil about 6 inches deep (NC State says 6 to 8) to help heat penetrate, and leave the surface smooth. Clods and litter leave air pockets under the plastic, which cut heating and let the plastic billow in the wind.[2][4][1][3]
- If you plant in raised beds, form them before solarizing so you won't disturb the soil afterward. Beds running north to south heat more evenly than east-west beds.[1]
- Wet the soil to at least 12 inches deep and lay the plastic as soon as you can afterward to limit evaporation. UT warns against overwetting, and UC IPM says not to water again unless the soil dries out, since extra water cools the soil and lengthens the treatment. NC State's version: moist but not waterlogged.[1][2][4]
- Use clear, transparent plastic rather than cloudy or milky film. UC IPM says black plastic is usually less effective because it absorbs and deflects part of the heat instead of trapping it, and UT says the sheet must be clear because other plastics let less sunlight through.[1][2][4]
- Thickness: 1-mil plastic heats best but tears easily, 1.5 to 2 mils holds up better in wind, and 4 mils or more is fine for small areas; UT recommends 2 to 4 mils. Painter's plastic from a hardware store should last the 4 to 6 weeks. NC State suggests clear sheeting 2 to 6 mils thick, and Colorado State 0.5 to 3 mils, with 2 mils or more where wind is a problem.[1][2][4][3]
- Pull the plastic tight against the soil and bury the edges in a trench 4 to 6 inches deep, then walk the edges to pack the soil down. The closer the plastic sits to the soil, the better it heats. Colorado State gives 5 to 6 inches for the buried edges.[1][2][3]
- For more heat in a small garden, lay a second clear sheet over the first with an air gap held open by things like plastic bottles, PVC pipe, foam strips, small wood blocks or old garden hose, avoiding anything with sharp edges, and bury the edges of both sheets. UC IPM says this adds 2° to 10°F over a single layer.[1][2][3]
- Check the plastic while it's down: seal holes with duct tape, re-bury edges that pull loose right away, and scoop soil out of puddles on the plastic, because muddy water blocks light. Clear water in a puddle does no harm.[2][3]
How long to leave it
UC IPM's goal is daily maximum temperatures of 110° to 125°F or more in the top 6 inches of soil. A soil thermometer or probe will show whether you're getting there.[1]
Four to six weeks during the warmest part of the year is usually enough for most soil pests. In cool, windy or cloudy places, or for pests that are hard to control, the plastic may need to stay up to 8 weeks. UT recommends at least 6 weeks; NC State and Colorado State say 4 to 6 weeks of hot summer weather, and UVM notes it can take as little as two weeks at the peak of summer but more likely four to six.[1][2][4][3][5]
After the plastic comes off
- Remove the plastic without disturbing the soil, then plant seeds or transplants for a fall garden, a winter crop or a lawn.[1][2]
- Keep any cultivation shallow, less than 2 inches by UC IPM's guidance or 2 to 3 inches by UT's, and avoid digging deep holes, so live weed seeds and pathogens from soil that didn't get hot enough stay buried. NC State's advice is simpler: don't till at all before planting.[1][2][4]
- Don't move soil from untreated furrows or edges onto the treated beds; it can bring the pests back.[1][3]
- UT advises against leaving the plastic down after summer, because it can encourage surviving soil pests in cool weather.[2]
- How long it lasts depends on the pest. In UT's Jackson plots, weeds were still down by 50 percent a year after solarization and crop yields stayed higher for over 12 months, but UC IPM says nematodes can return quickly from deeper soil.[2][1]
- Watch plastic that has no UV inhibitor and take it up before it breaks down too far to remove and dispose of easily. Colorado State found thin plastic was badly damaged by birds and by breaking down in sunlight.[1][3]
Solarizing soil for pots and cold frames
Small amounts of moist soil can be solarized in bags, pots, buckets or flats set on an elevated surface such as wooden pallets and covered with a double tent of clear plastic. The double layer can raise temperatures by up to 50°F, and the pallets let heat reach the soil from all sides. Moist soil in closed black trash bags on pallets also works.[1]
Put a soil thermometer in the center of the soil mass. As a guideline, UC IPM says holding 158°F or higher for 30 minutes eliminates pests; in warmer parts of California, soil in black plastic bags can top 160°F, hot enough to kill all soil pests within an hour.[1]
Solarizing mulch and compost for jumping worms
UVM Extension suggests solarization for mulch, compost and topsoil that might carry invasive jumping worms, which live and breed near the soil surface. Spread the material 4 to 6 inches thick on a tarp, cover it with clear plastic, and tuck the plastic under the tarp's edges so no worms can escape.[5]
UVM says it takes at least three days with internal temperatures of 104°F or more to kill the worms and their cocoons. Minnesota Extension cites a study where adults died after three days at 85°F and cocoons after three days at 104°F, and notes that worms in open ground can crawl to cooler soil to escape the heat.[5][6]
Common questions
- Can I use black plastic instead of clear?
- Clear works best. UC IPM says black plastic usually absorbs and deflects part of the heat instead of trapping it in the soil, and UVM says black plastic (occultation) stops plant growth but doesn't heat the soil enough to kill soil-borne diseases or pests. UC IPM notes one exception: in cooler or coastal areas, black plastic left on for several weeks during the hottest weather can do better than clear, because weeds grow under clear plastic when it isn't hot enough to kill them.[1][5]
- Will solarization get rid of nematodes?
- It reduces them, mostly in the top 12 inches, but less reliably than it controls diseases and weeds. Nematodes deeper in the soil survive and move back up quickly after treatment.[1][3]
- Does solarization kill earthworms and good soil microbes?
- Some beneficial organisms die, but beneficial bacteria and fungi recolonize quickly, and earthworms are generally thought to burrow deeper to escape the heat.[2][1][3]
- Will summer rain ruin it?
- Cloudy days heat the soil less, and UC IPM says not to add water unless the soil dries out, because extra water cools the soil and lengthens the treatment. Clear water pooled on the plastic does no harm, but clean out any soil that collects in the puddles.[1][2]
- Can solarization kill jumping worms?
- It can help in mulch, compost or topsoil spread thin under clear plastic: UVM and Minnesota Extension both point to three days at 104°F to kill the cocoons.[5][6]
Photo credits
- Root-Knot Nematodes: Plant pests and diseases, public domain (CC0), via Wikimedia Commons
- Jumping Worms: (c) geosesarma, some rights reserved (CC BY) — via iNaturalist, CC BY 4.0
Sources
- University of California Statewide IPM Program, “Pest Notes: Soil Solarization for Gardens & Landscapes.” ipm.ucanr.edu/home-and-landscape/soil-solarization-for-gardens-landscapes/ (accessed 2026-11-10)
- University of Tennessee Extension, “W 363 Soil Solarization in Tennessee: A Pesticide-Free Method for Controlling Soil-Borne Pests in Home Gardens.” uthort.tennessee.edu/wp-content/uploads/sites/228/2023/11/W363.pdf (accessed 2026-11-10)
- Colorado State University Extension, “Soil Solarization, an alternative to soil fumigants (Fact Sheet 0.505).” webdoc.agsci.colostate.edu/aes/wcrc/techbulletins/soil%20solarization.pdf (accessed 2026-11-10)
- N.C. Cooperative Extension, Hoke County Center (NC State), “The Perfect Weather for Solarizing Soil.” hoke.ces.ncsu.edu/news/solarizingsoil/ (accessed 2026-11-10)
- University of Vermont Extension, “Tarping, Solarization and Occultation.” www.uvm.edu/extension/news/tarping-solarization-and-occultation (accessed 2026-11-10)
- University of Minnesota Extension, “Jumping worms.” extension.umn.edu/natural-resources/forestry-and-wildlife/invasive-species/jumping-worms (accessed 2026-11-10)